
Replacing the Default OVHcloud Gateway with pfSense on Nutanix NC2
A complete guide to replacing the default OVHcloud gateway with a pfSense firewall on Nutanix NC2.

Introduction
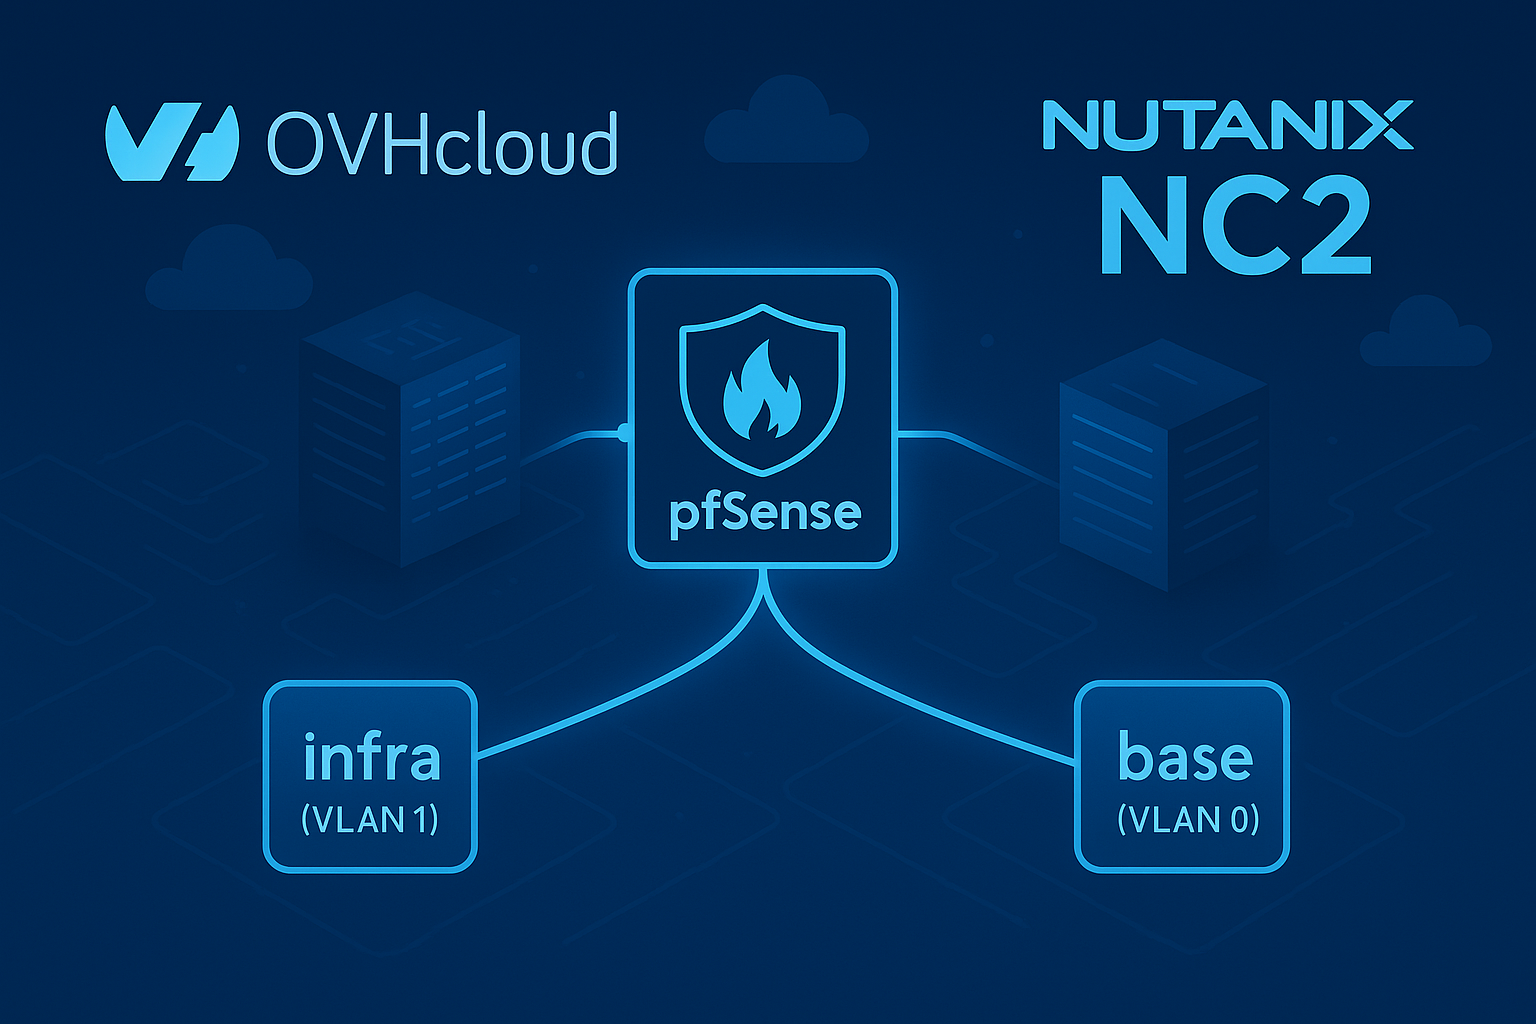
Nutanix Cloud Clusters (NC2) on OVHcloud bring the full Nutanix Cloud Platform to dedicated bare-metal infrastructure with native VLAN networking and data sovereignty.
By default, each cluster includes a lightweight OVHcloud software gateway VM that provides basic NAT and outbound Internet connectivity. While suitable for initial deployments, this default gateway has limited flexibility. For environments that require VPN, custom routing, or advanced firewall capabilities, it is best replaced with a pfSense virtual appliance.
This guide explains how to deploy pfSense as your new gateway inside NC2, using only the Prism Central web console. No CLI is required.
Identify the Default OVHcloud Gateway
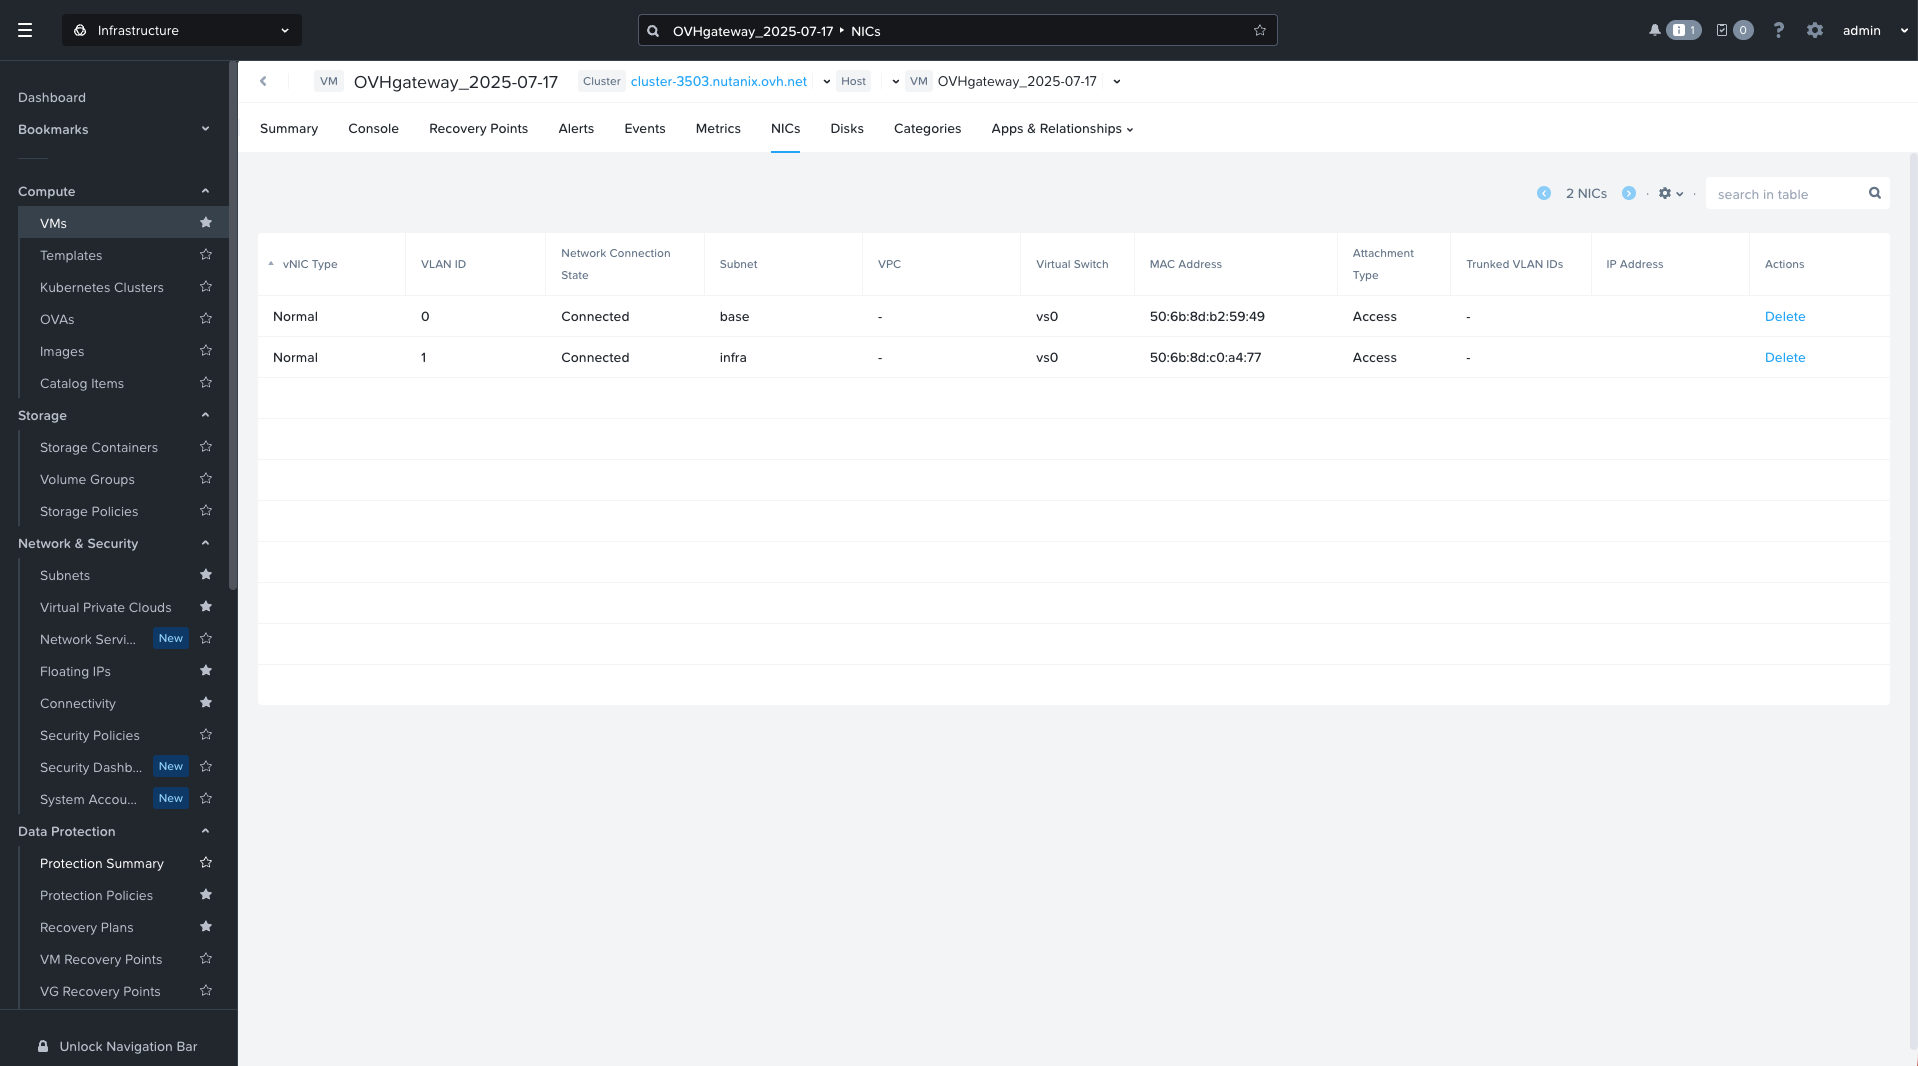
In your NC2 environment, you will find a VM named something like OVHgateway_YYYY-MM-DD.
This VM typically has 1 vCPU, 1 GB RAM, a 1 GB disk, and two NICs connected to VLAN 0 (base) and VLAN 1 (infra).
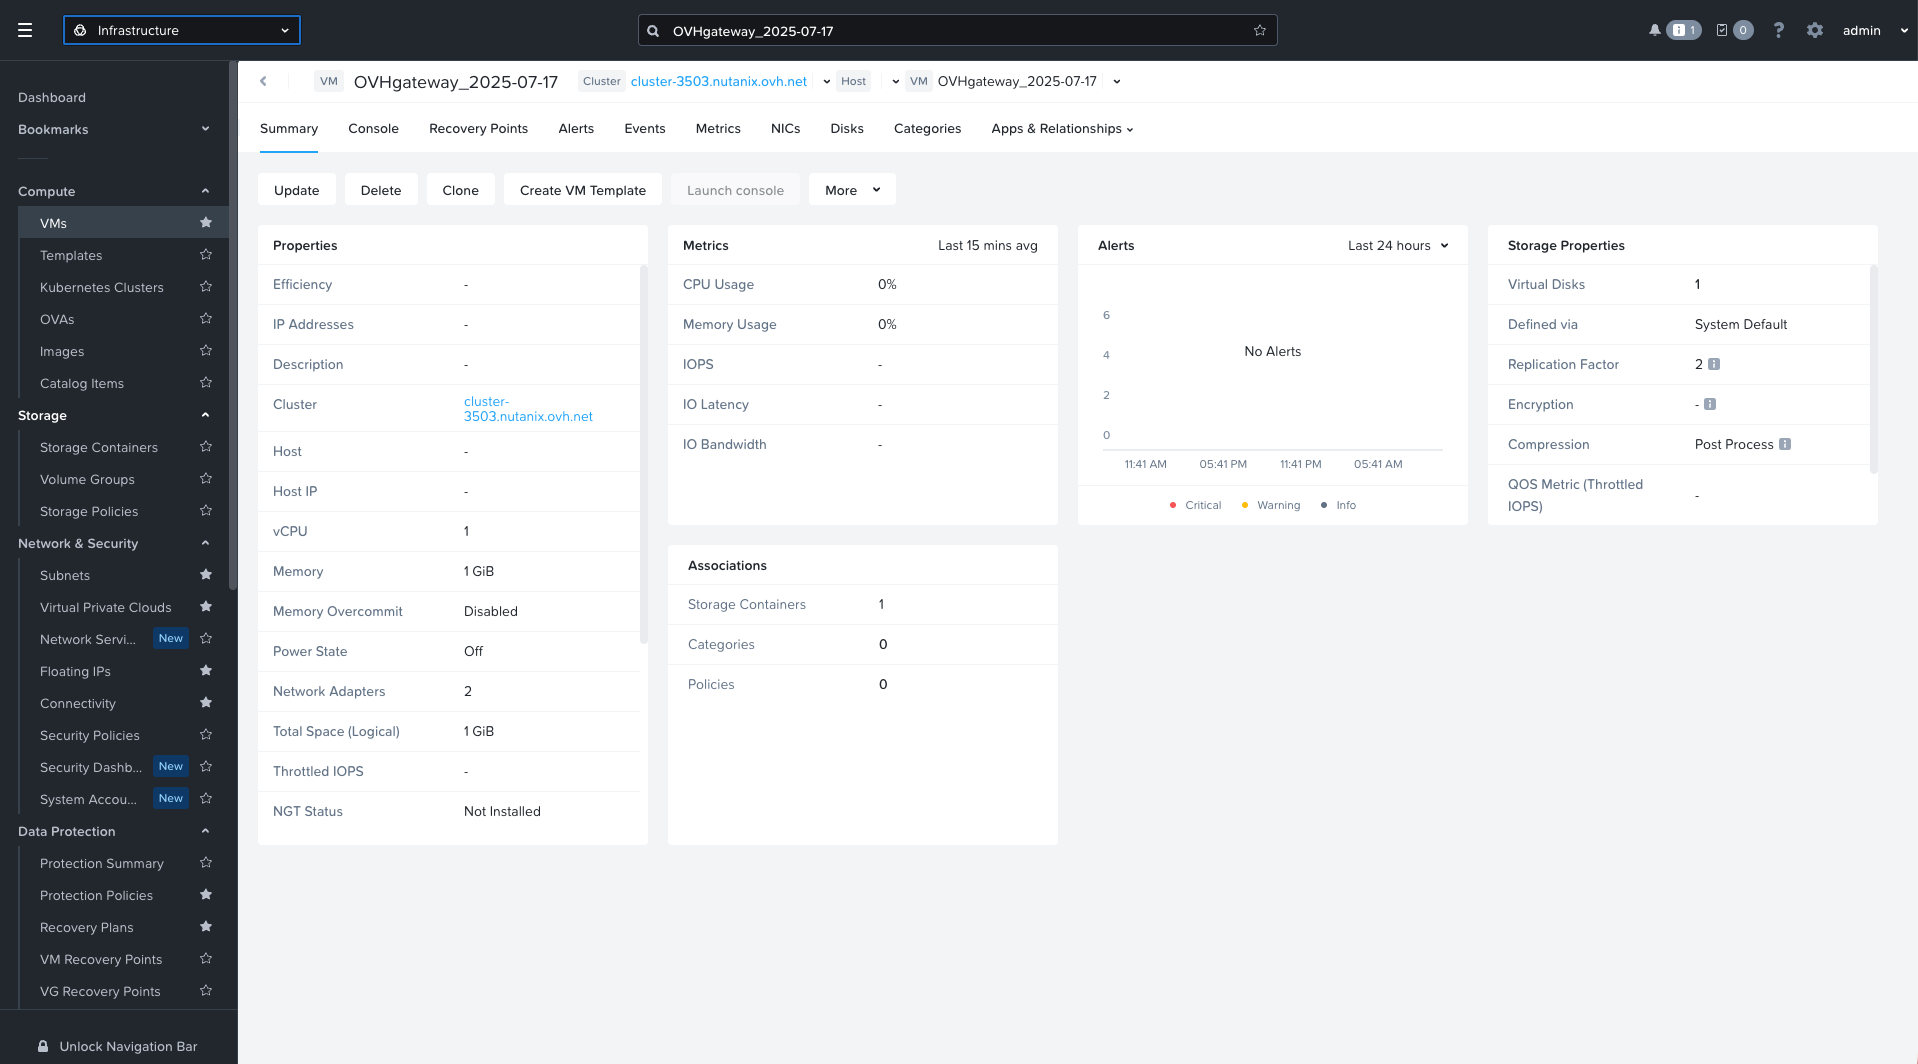
This VM handles NAT and outbound connectivity for workloads on the infra VLAN. You will be replacing it with pfSense in the same cluster.
Check VLAN Configuration
In Prism Central → Network & Security → Subnets, you should see at least two VLANs available.
| Name | VLAN ID | Type | Virtual Switch |
|---|---|---|---|
| base | 0 | VLAN | vs0 |
| infra | 1 | VLAN | vs0 |
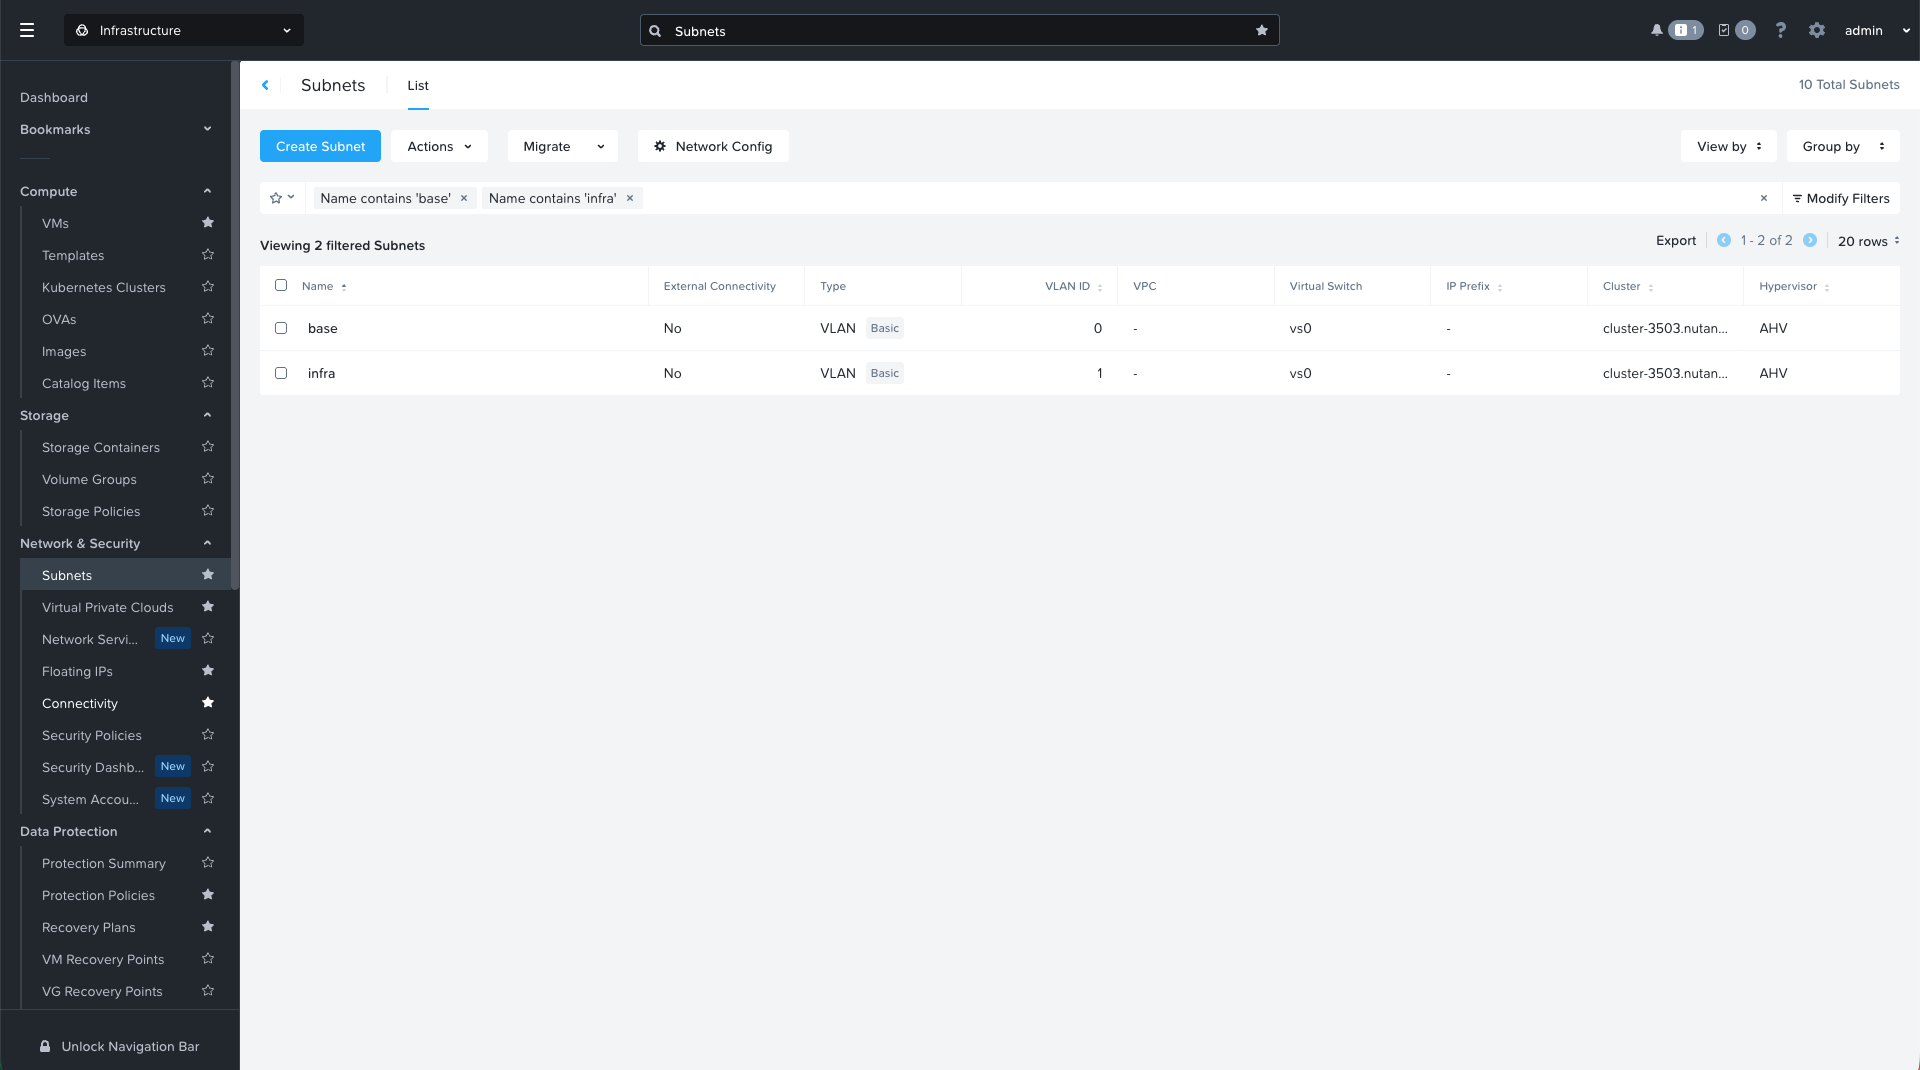
These VLANs will map to your pfSense interfaces as follows:
- WAN → VLAN 0 (base)
- LAN → VLAN 1 (infra)
Upload the pfSense ISO
Download the latest pfSense ISO (version 2.8.1) from pfsense.org/download.
Select the following options:
- Architecture: AMD64 (64-bit)
- Platform: ISO Installer
In Prism Central → Image Configuration → Upload Image, upload the ISO to your image library.
It will appear as something like pfSense-2.8.1.iso.

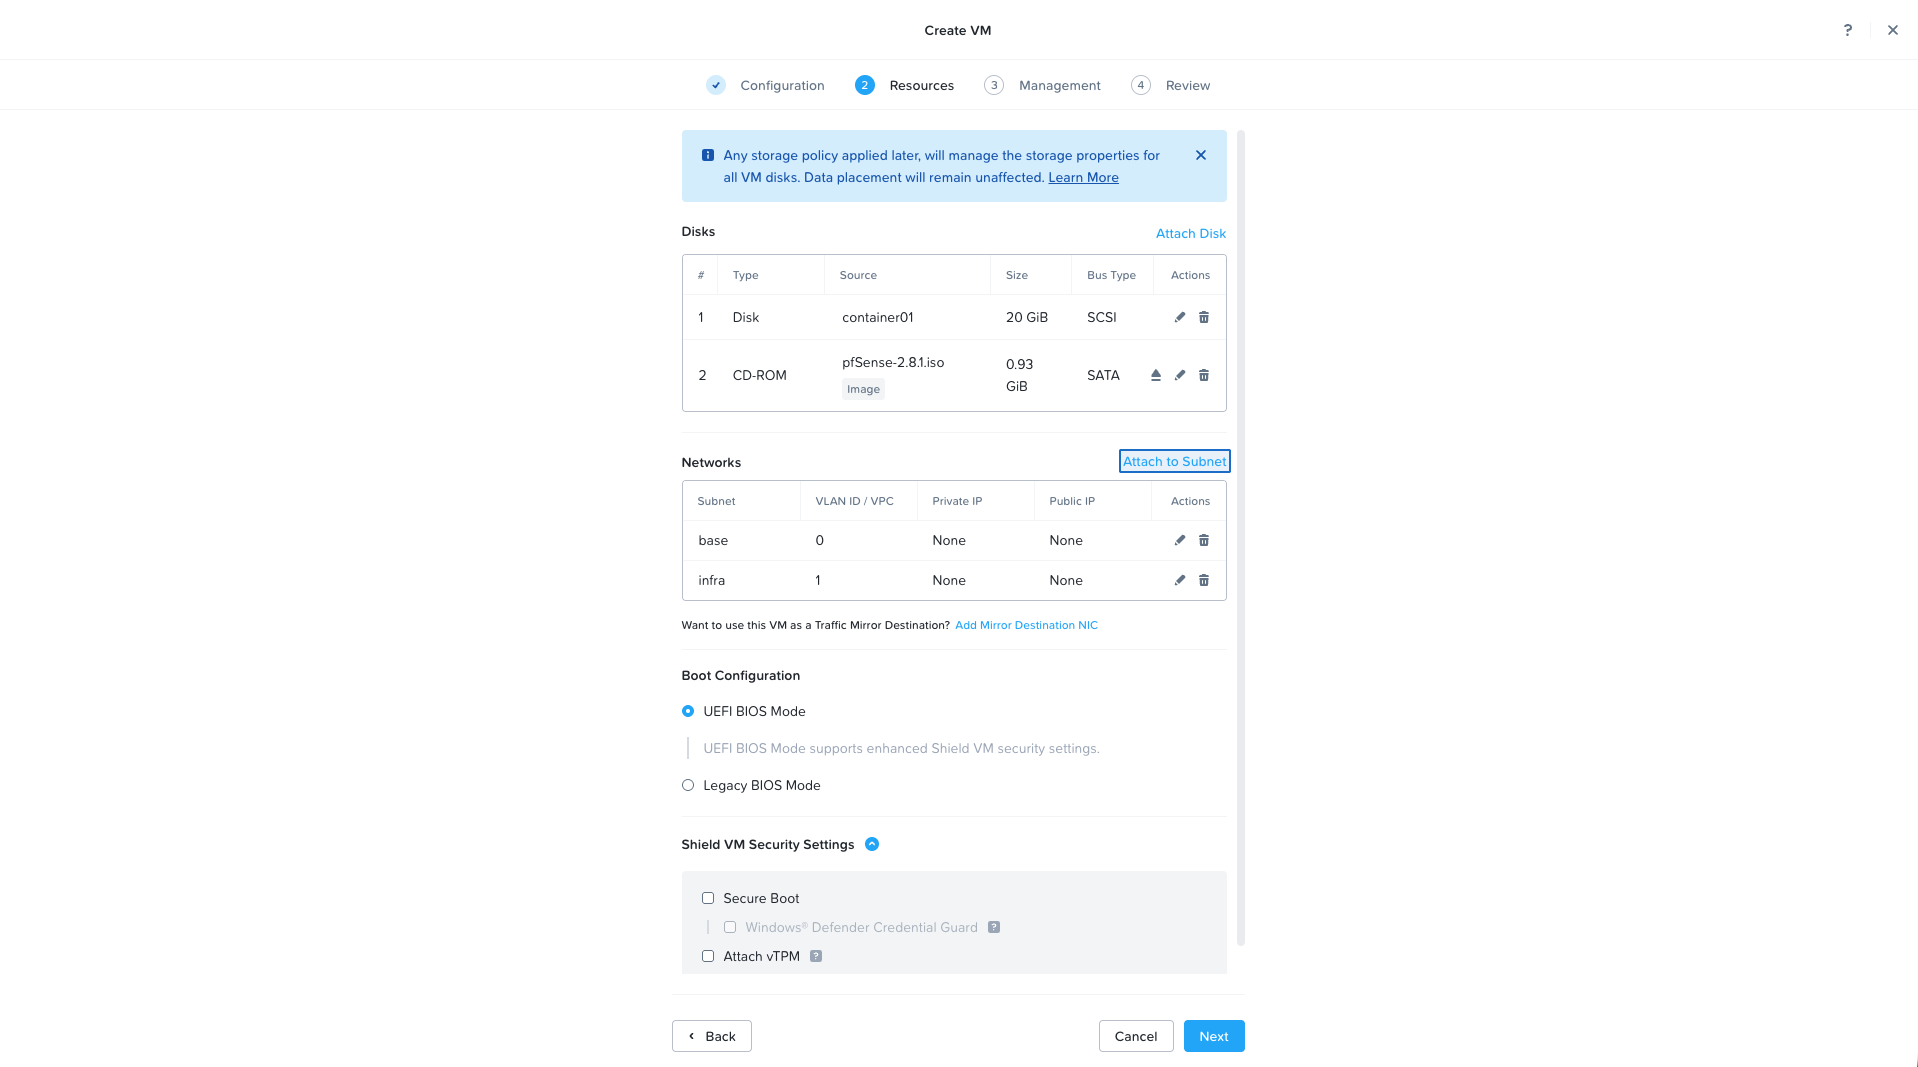
Create the pfSense Virtual Machine
In Prism Central → VMs → Create VM, configure the following parameters:
- Name: OVHgateway_pfSense
- vCPUs: 2
- Memory: 4 GB
- Disk: 20 GB
- Boot image: pfSense-2.8.1.iso
Add two network adapters:
- NIC 1 → VLAN 1 (infra, LAN)
- NIC 2 → VLAN 0 (base, WAN)
Prepare for Gateway Replacement
Before powering on the new pfSense virtual machine, you must power off the default OVHcloud software gateway to avoid IP address conflicts on VLAN 0 (base).
However, make sure to record its current configuration first.
- In Prism Central → Virtual Machines → OVHgateway → Network tab, note the IP address assigned to the interface connected to VLAN 0 (base).
This is the current public IP and will match the N+1 address in your OVHcloud/30range (for example51.89.76.69). - In the same tab, note the IP address of the interface connected to VLAN 1 (infra).
This is the internal gateway currently used by your workloads, and it must fall within your infra subnet (in your environment,172.16.0.254in172.16.0.0/22).
Once both addresses are noted, shut down the OVHgateway VM from Prism Central.
This ensures that the IPs will be available for pfSense and that no duplicate gateway is active on the same VLANs.
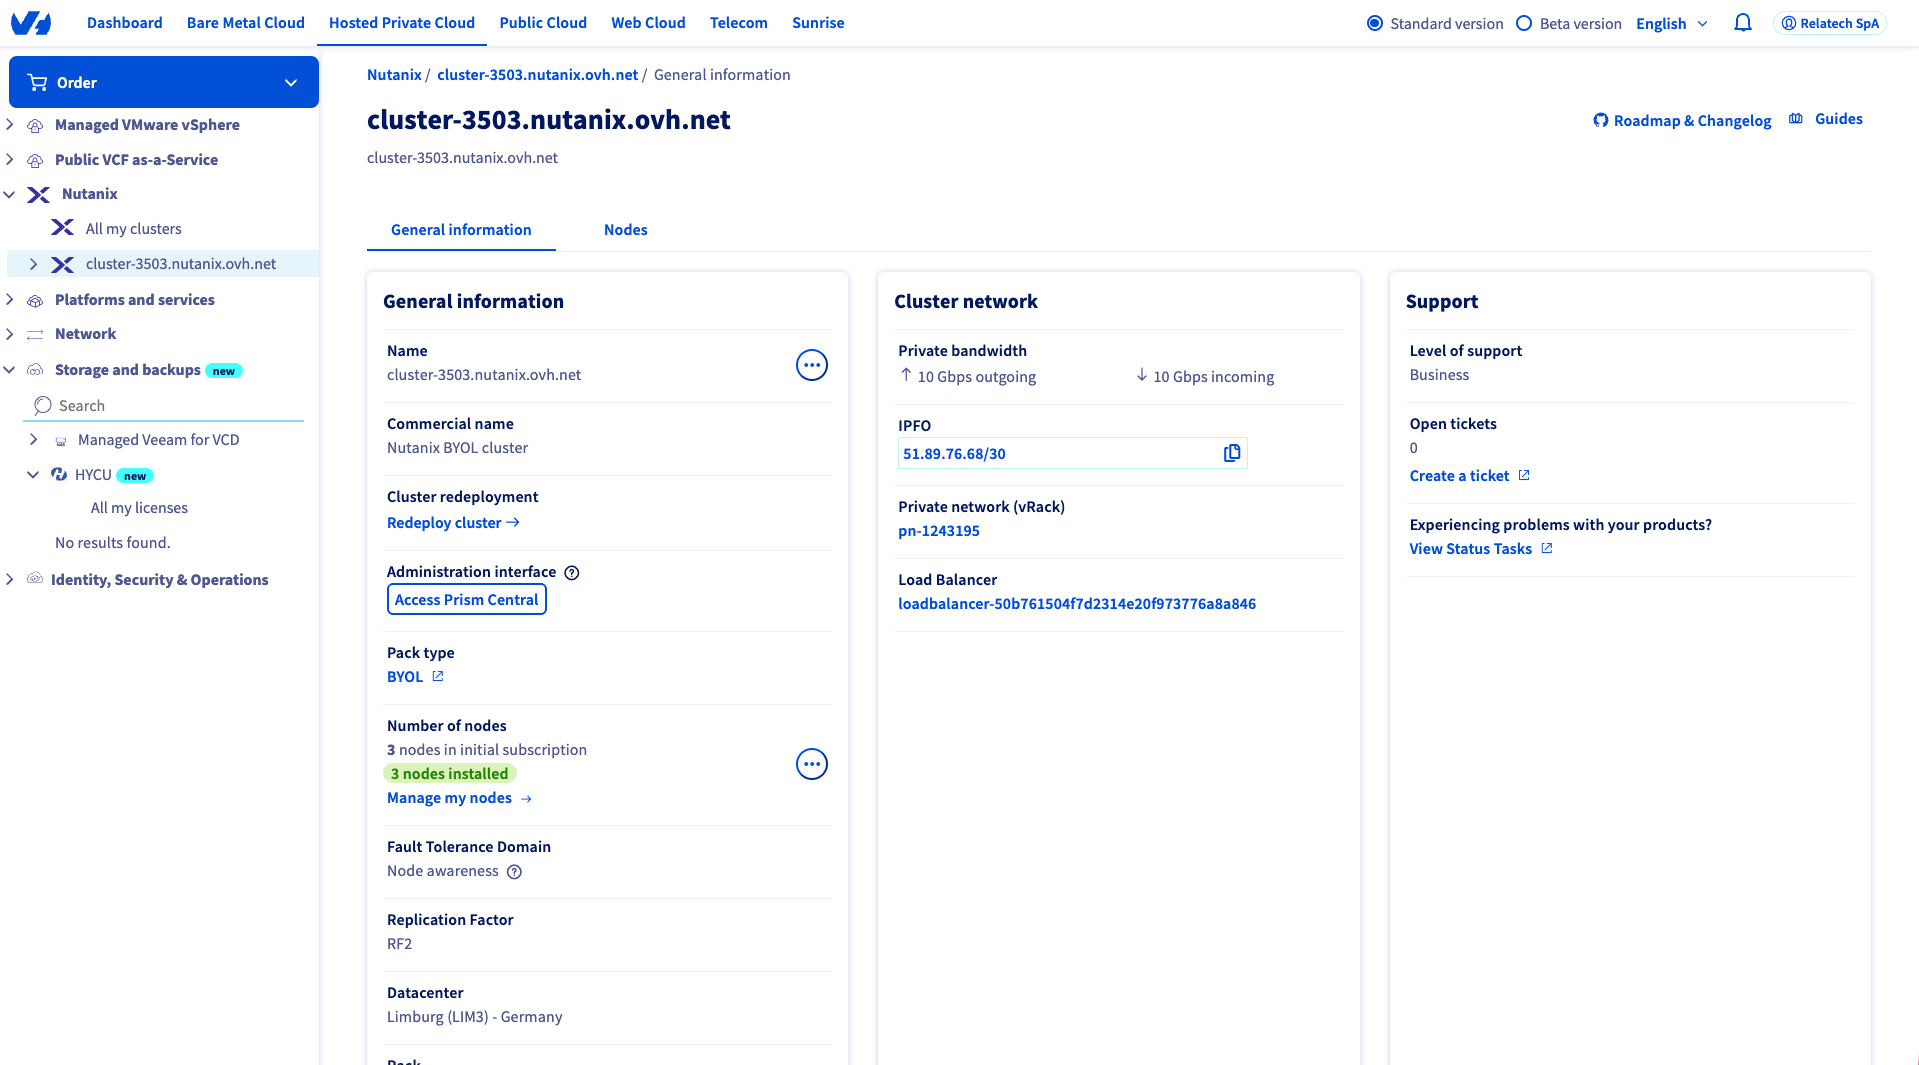
Retrieving and Understanding Your Public IP Configuration
Before configuring pfSense, retrieve the public IPv4 block assigned to your NC2 cluster.
This information is available directly in the OVHcloud Control Panel, under the Nutanix section of the Hosted Private Cloud menu.
- Log in to OVHcloud Manager
- In the left-hand menu, go to Hosted Private Cloud → Nutanix
- Select your cluster service
- Under Cluster network, locate the IPFO field
OVHcloud assigns each NC2 environment a dedicated /30 IPv4 block consisting of four IP addresses.
According to the official documentation, the addressing scheme follows this simple rule of thumb:
- N → network address
- N+1 → IP address to assign to your pfSense VM (WAN interface)
- N+2 → default gateway address to configure inside pfSense
- N+3 → broadcast address
Example configuration:
WAN IP: 51.89.76.69
Subnet mask: 255.255.255.252
Gateway: 51.89.76.70
💡 OVHcloud uses /30 subnets to provide a point-to-point link between your cluster and the OVH network.
LAN (Infra VLAN)
For your internal network, use VLAN 1 (infra) and define a private subnet that pfSense will manage.
In this setup, the LAN network uses the 172.16.0.0/22 range, giving flexibility for multiple internal segments. pfSense will act as the default gateway for all workloads on this network.
LAN IP: 172.16.0.254
Subnet mask: 255.255.252.0
DHCP range (optional): 172.16.0.100–172.16.3.200
All VMs connected to VLAN 1 should use 172.16.0.254 as their default gateway.
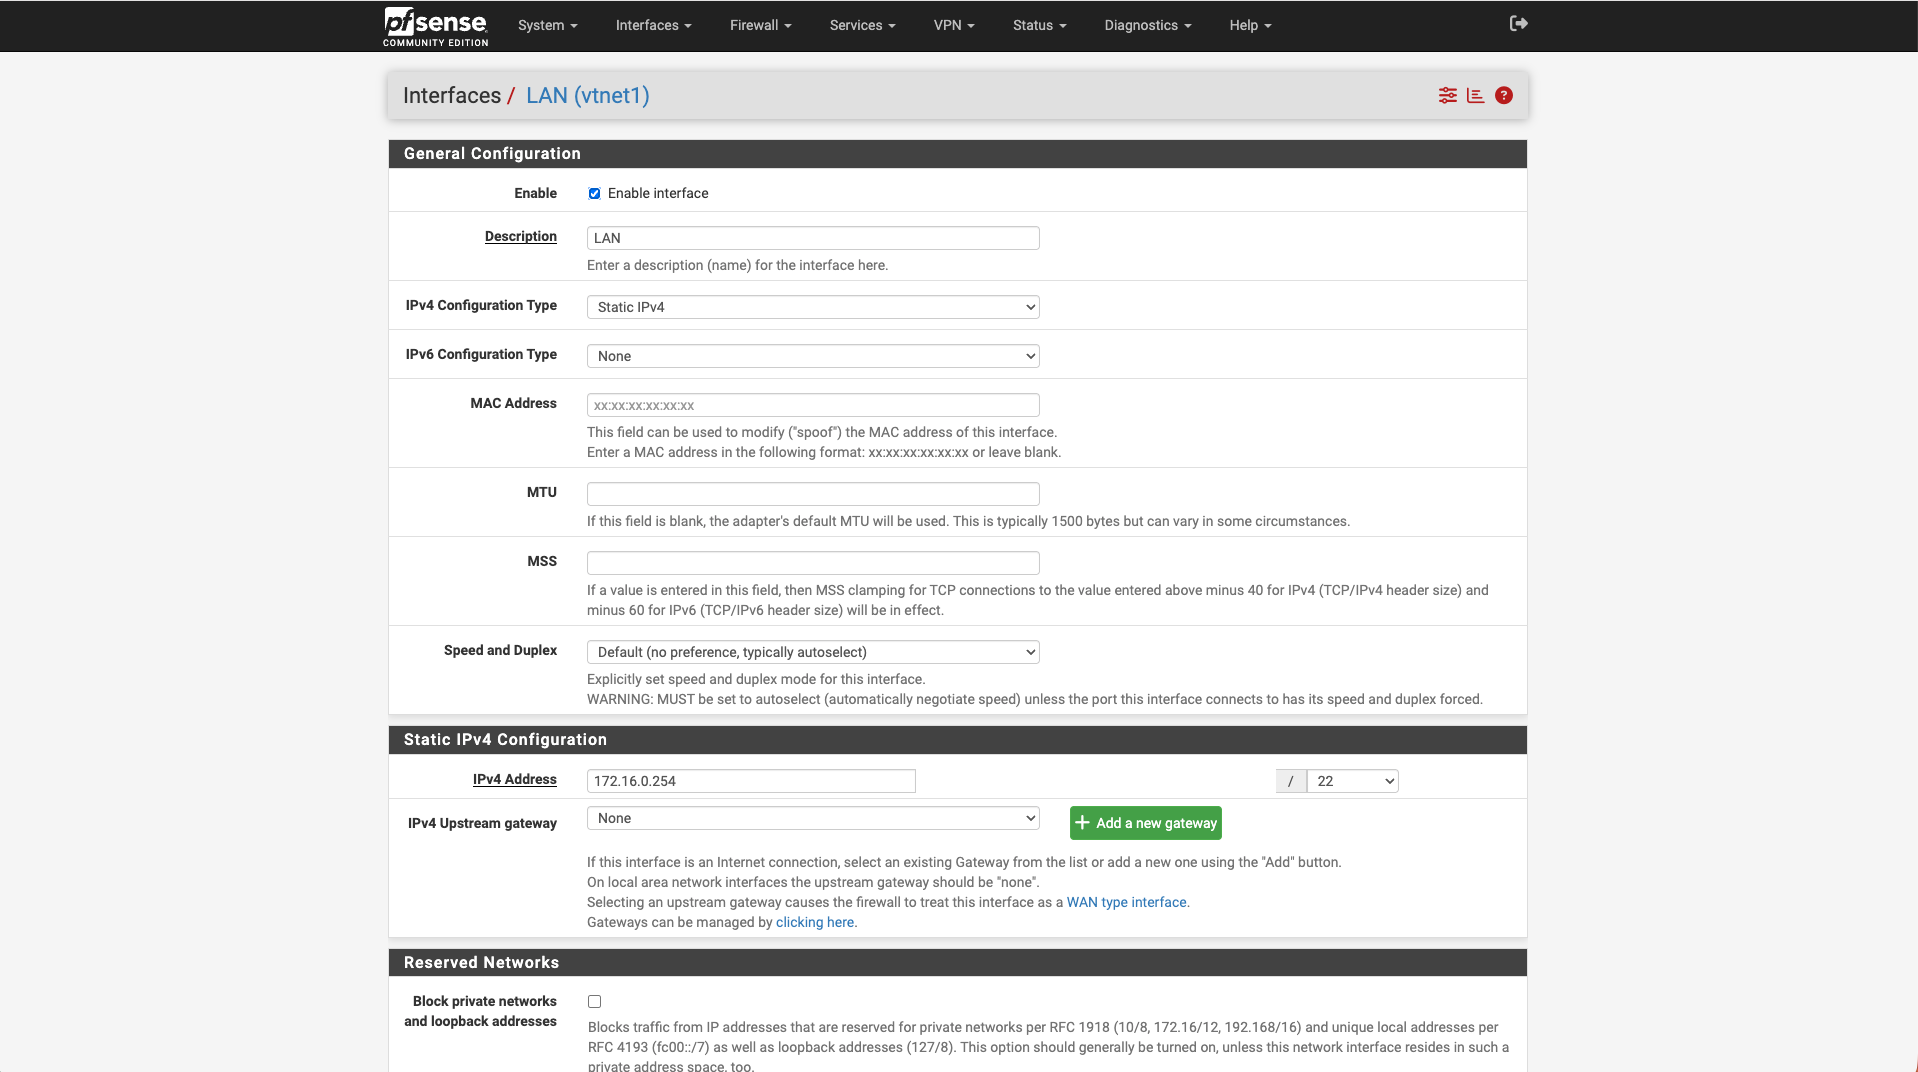
Install pfSense
Start the VM and open its Console from Prism Central.
Follow the installer prompts and accept defaults.
At the end of the installation, assign interfaces as follows:
LAN (VLAN 1) → 172.16.0.254/22
WAN (VLAN 0) → 51.89.76.69/30
📷 [Screenshot: pfSense 2.8.1 console showing interface assignment summary]
After installation, access pfSense via browser at https://172.16.0.254
Default credentials:
- Username: admin
- Password: pfsense
If you do not have a VM on the LAN
If no machine is available on VLAN 1 to reach the web UI via the LAN IP, you can perform the first login from the WAN temporarily.
- Open the VM console from Prism Central and log in to the pfSense shell.
- Disable packet filtering to allow temporary access on the WAN interface:
pfctl -d - From your workstation, browse to the public WAN IP of pfSense using HTTPS, for example
https://51.89.76.69, and log in. - Go to Firewall → Rules → WAN and add a rule that allows TCP 443 to the firewall from your specific public IP. Give the rule a clear description.
- Re-enable filtering from the console or the shell:
pfctl -e
You can also re-enable filtering by rebooting pfSense after saving the rule.
This procedure lets you complete the initial setup even without a LAN VM while keeping WAN access restricted to your source IP.
Configure pfSense
After completing the installation, pfSense is ready to operate as the main network gateway for your NC2 environment.
The default configuration already includes automatic outbound NAT and routing between the LAN and WAN interfaces.
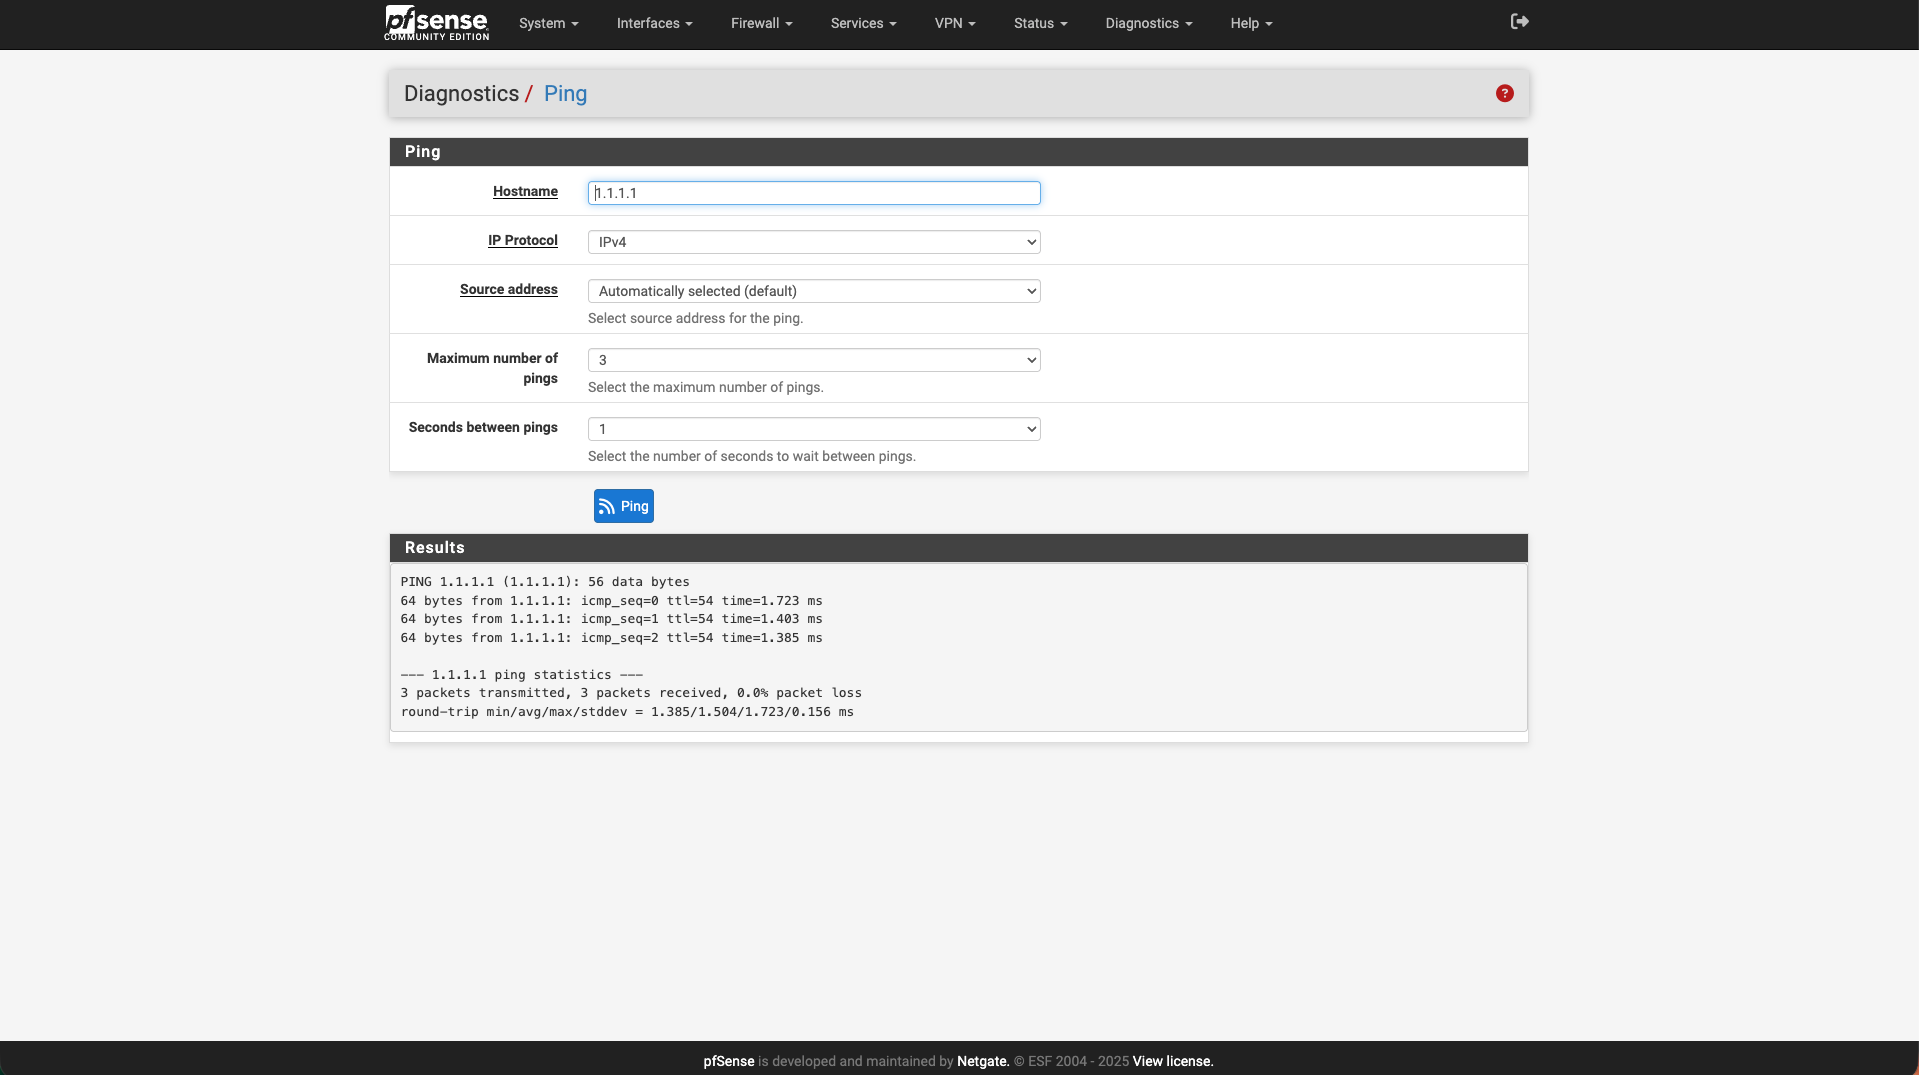
Before connecting workloads, it is recommended to verify that internal and external connectivity are working as expected.
From the pfSense web interface, open Diagnostics → Ping and test the following targets:
- 172.16.1.100 (your Prism Central instance on the infra VLAN)
- 51.89.76.70 (the WAN gateway assigned by OVHcloud)
- 1.1.1.1 (an external host to confirm outbound Internet access)
Successful replies from these addresses confirm that pfSense can reach both internal resources and the Internet through the WAN uplink.
You can then review System → General Setup to configure custom DNS servers or internal forwarders, and System → Routing if you plan to add static routes for other VLANs or connected networks.
Once these verifications are complete, workloads attached to VLAN 1 will have full Internet access through the pfSense gateway.
Optional Enhancements
The pfSense gateway configured in this guide already delivers full routing and NAT capabilities inside your Nutanix NC2 environment. It provides a solid and self-contained foundation for managing internal and external traffic, while leaving room for advanced extensions that can be enabled later as your network evolves.
One of the most common enhancements is the deployment of site-to-site VPNs to connect your NC2 cluster with other data centers or cloud environments. pfSense supports both IPsec and OpenVPN, which can be configured directly from the graphical interface. These tunnels enable secure hybrid networking between on-prem systems, public cloud workloads, or other NC2 regions hosted on OVHcloud.
Another frequent extension is the client VPN service, which allows administrators or developers to connect securely to the internal network from outside. By configuring an OpenVPN or WireGuard server, users can access Prism Central, workloads, and internal VLANs through an encrypted connection without exposing management interfaces to the Internet.
For additional network visibility, pfSense can integrate Suricata in intrusion detection mode (IDS). Suricata inspects live network traffic, identifies anomalies, and logs potential threats between the infra and base VLANs. Its alerts can be visualized in pfSense or exported to a central SIEM platform, improving operational awareness across the environment.
High availability can also be achieved through CARP (Common Address Redundancy Protocol). This feature allows two pfSense instances to share virtual IP addresses and fail over automatically in case of maintenance or outages.
However, in the OVHcloud NC2 context, each environment is provisioned with a dedicated /30 block that contains only one usable public IP address. Configuring CARP on the WAN interface therefore requires additional public IPs assigned to the cluster. These addresses must be requested and approved by OVHcloud support before setting up HA pairs.
Each of these enhancements can be implemented independently and does not require changing the base configuration. This modular approach makes pfSense a flexible, production-grade gateway solution for Nutanix NC2 on OVHcloud.
Conclusion
Replacing the default OVHcloud software gateway with pfSense 2.8.1 gives you full control over your NC2 environment’s routing, NAT, and firewall policies, all managed from Prism Central.
This approach is fully supported by OVHcloud, requires no CLI, and scales perfectly across VLAN-based architectures.
It is ideal for custom routing, VPN integration, advanced traffic segmentation, and enterprise-grade control within NC2 on OVHcloud.
Note
All IP addresses and configuration details shown in this article come from a temporary Nutanix NC2 on OVHcloud proof-of-concept environment that will be decommissioned.
They are provided for documentation purposes only and do not represent any active or production infrastructure.